5 Ways To Re-Engage Website Visitors With Facebook Custom Audiences

Do you use Facebook to attract clients to your dropshipping store? Do you want to know how to use your visitors’ activity when advertising on Facebook? From this article, you will learn how to set up Facebook custom audiences that you can utilize to generate new sales or attract traffic to your website.
In our experience, Facebook custom audiences are a highly helpful and really efficient tool: when we use them for our stores’ advertisements, the approximate purchase volume reaches the mark of $40 – and at the same time, the average conversion cost is only $4,5!
What do we do to achieve these impressive results? Let’s find it out!
What is a custom website audience?
Custom audiences, also known as website traffic custom audiences, let you create segments than unify people who visited certain pages or performed certain actions on your dropshipping website. You can later target these audiences with relevant advertising campaigns.
These custom audiences are best used in remarketing campaigns since they are targeted at the “hottest” audience of website visitors.
The goal is to repeatedly attract people who have visited your online store, but didn’t take any action. For example, these might be the people who browsed your site, but didn’t make a purchase.
How to create Facebook custom audiences?
First, you need to set up Facebook pixel.
After that, go to the “Audiences” toolbox via Facebook Ads Manager main menu.
Click «Create Audience» on «Audiences» panel, and choose «Custom Audience» in the dropdown menu.
Choose «Website Traffic» in «Create a Custom Audience» window.
You will see a “Create a custom audience” window. Here, you can create different audience options to define various types of your website visitors.
What are the basic types of user audiences?
- Standard website custom audiences include default settings and are based on the visited URL and time that the user spent on your website.
- Event-based website custom audiences are based on user actions that you set up on your website. For example, Add to Cart or Purchase.
- Advanced website custom audiences combine both standard settings and event-based settings.
5 types of Facebook custom audiences you can create and target
Now, let’s take a look at 5 user audiences that you can use in promoting your dropshipping store.
1. Audience of users who visited your store within a certain period of time
When creating user audiences, by default, you see the “All website visitors” button. This criteria is turned on automatically when you start creating a user audience. This function suits a website with low traffic that doesn’t allow you yet to target the visitors using Page Views.
For all user audiences, you need to specify the time frame that is required to attribute the users to this particular audience.
In our example, we have selected a 30 days period. A longer time period, for example 60 days, will create a wider audience, but a shorter interval is better for displaying advertisements. So, choosing a 30-day period, you will be showing advertisements only to the people who have been to your website during a 30-day period and not more. These visitors are “warmer”, and are more likely to remember about your store than those that visited your site 60 days ago.
To complete the creation process, enter your audience name and press “Create Audience”.
2. Audience of users who visited a certain product page without purchasing the product
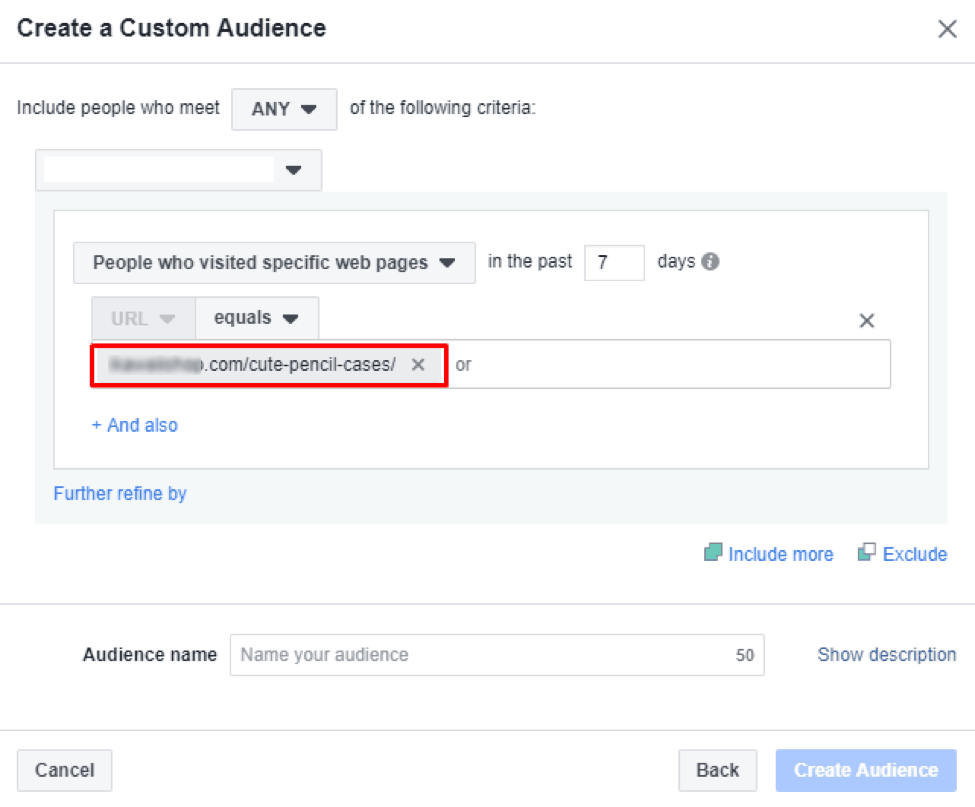
Another type of user audience, especially relevant for e-commerce, consists of the people who viewed a certain product page, but didn’t make a purchase. This extended audience combines a certain URL condition with an event action.
To create this audience, first choose «People who visited specific web-pages», and then choose «Equals» in the «Contains» dropdown. Below, in “URL” field, enter a specific URL of a product page that people need to visit to be included into your audience. You don’t need to include the “www” or “https” part into this URL.
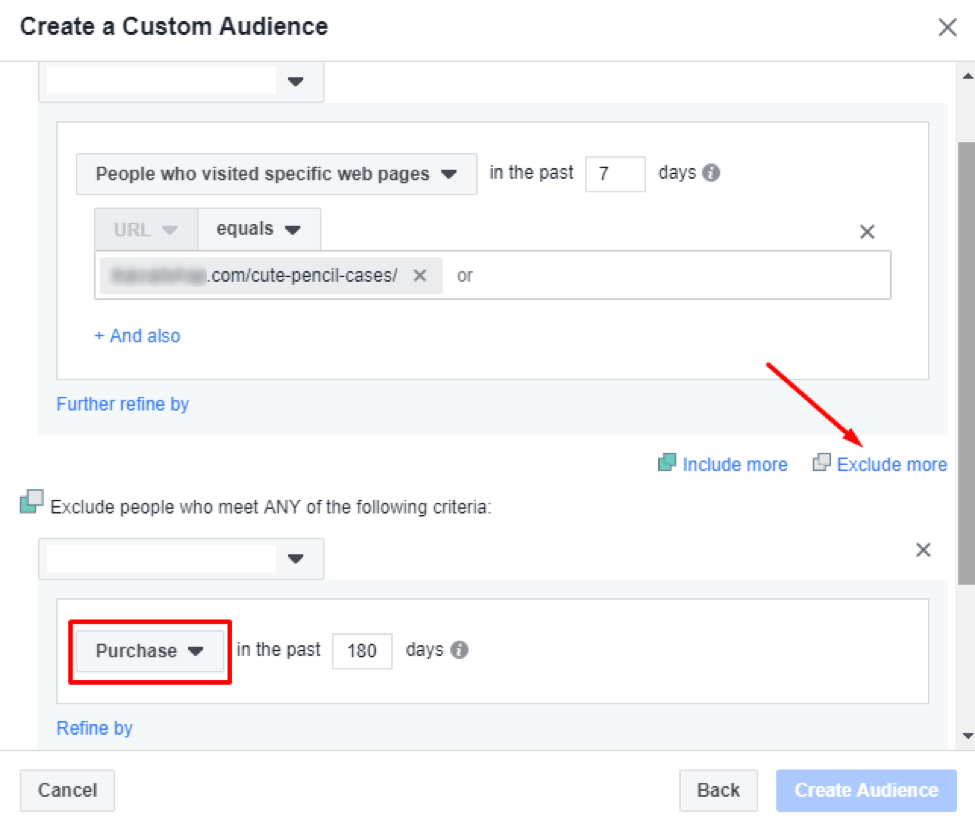
Here, you can also add an exclusion condition. Press «Exclude» to open a window where you can select conditions for exclusion. In the «From your events» dropdown, choose «Purchase».
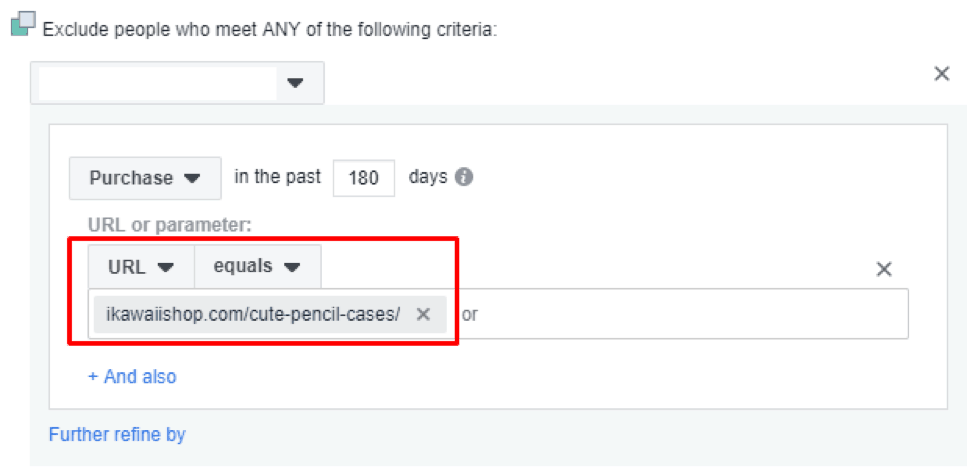
Using the product URL, you can then specify a purchasing condition to exclude people who have already bought this product.
To do this, click on a URL, then press on the “Contains” dropdown and choose “Equals”. Insert the product link.
Finally, set the time interval to include visitors into the audience. You can collect the audience who have paid a visit to the product page during 7 days and have not completed a purchase in 180 days.
Name the audience in a way that will help you understand the included conditions. In our example, WCA means “Website Custom Audience”.
3. Audience of users who added a product to the cart, but didn’t complete the purchase
This audience is based on the events on your website, and it is very effective for e-commerce stores. Through the creation of this audience, you will group the people who have visited your site and started a purchase process, for example added a product to cart, but did not complete their purchase.
To start working with this audience, choose the «Add to Cart» action in the dropdown. Then, press «Exclude» and choose «Purchase».
You can experiment with different time periods for target events “Add to Cart” and “Purchase”.
4. Audience of users who previously made purchases on your website
This user audience lets you show advertisements to clients who already completed a purchase on your website. You can offer them new goods and exclusive discounts to stimulate new purchases.
To create this audience, choose “Purchase” in the “From your events” dropdown.
You don’t need to make any inclusions or exclusions here. The last step is setting up the time period (180 days will create the biggest audience size) and giving this audience a name.
5. Audience of users who viewed your blog
If you have a blog on your website, this audience is a good pick for you as it lets you target your readers. This is a highly sensitive audience that you can run offers to, or even promote more content to boost your store recognition and improve the relations with your potential clients.
To create this audience, choose «People who visited specific web-pages», and enter «blog» as a keyword in the «Contains» field. This way, you will group everyone who have visited the page containing the URL of a specific post. In our example, we used the links of the most viewed posts from our blog.
It is a good idea to create several audiences with different time frames to see the size of your audience. Start with testing 30, 45 days and 90 days.
As you can see, custom user audiences make a huge impact on the process of setting up Facebook Ads. With the help of custom audiences, you can return visitors to your website and boost traffic to increase sales volumes.
Do you use Facebook custom audiences for your store promotion? Which ones do you consider the most effective for your business? Share your thoughts in the comment section below!


